
How To Use Trello To Create A Content Calendar
We use Trello to plan out our blog and social media posts! Here's how you can setup a Trello board to do the same for your business!
These days, being active and engaged online is vital to your business! Making it a priority to post and plan is so important. When people see you kicking out new content or posting on social media, you’re able to reach more people, you’re able to speak directly to your audience, position yourself as an expert, and you’re able to build trust and loyalty because you look like you’re killing it online.
Posting new and engaging content shows your potential clients or customers that you’re active, engaged and showing that your business is thriving online. THAT can ultimately make the difference in whether or not someone hires you or buys from you.
But, that can feel a little overwhelming and people think that they have to be cranking out millions of posts in a short timeframe. We don’t! We believe in posting consistently and posting quality over quantity. We also believe in batch working at Go Live HQ, which means we plan out in chunks! It saves us so much time, plus we can be more thoughtful and strategic about each post we have coming up in the month. It feels so much better than flying by the seat of our pants each day.
We plan ahead using several tools including Trello – which is FREE!! Check out the video or follow the steps written below to see exactly how we use Trello boards to manage all of our content and task lists.
How To Setup Trello As A Content Calendar
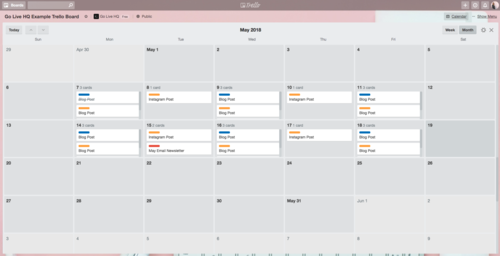
Step One: Create A Board And Add A Calendar Power-Up
Easy! Get on Trello and create a board. Once it's open, click "Show Menu" in the top-right corner. Click "Power-Ups" and find the Calendar Power-Up. Once you do, you should see a "Calendar" button in the top-right corner. If you click it, your screen will switch from your board view to a calendar view.
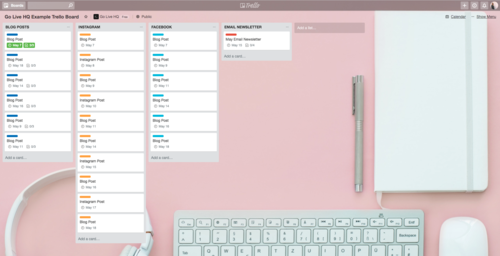
Step Two: Create A List For Each Platform You Use
This can be as simple as one list for your blog, or like us, you could have multiple lists for your blog, mailing list, Instagram, Facebook, etc. If you tend to post the same thing to each social media platform, you can probably have a blog post list, a mailing list, and a social media list to keep it simple.
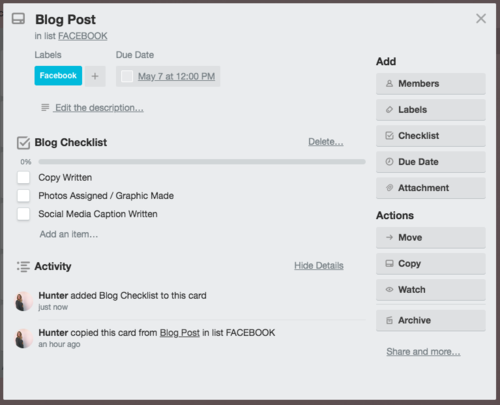
Step Three: Add Cards To Each List With Your Post Detail
You can create checklists inside each card to make sure you get everything done that you need to for each post. If this tends to be the same across the board, you can re-use your checklists from different cards easily! Follow the instructions here to see how to duplicate checklists in Trello.
Want some tips for actually filling in your content calendar? We've got the rundown on what a content calendar is, why you need one, and tips to make planning and creating helpful content feel like a breeze instead of a nightmare. Check out our 5 Tips To Get Started On Your Content Calendar.
Now you have a content calendar to keep you organized so you can post content consistently.
And if you’re looking for an updated & refreshed website look (to generate traffic to), check out our premium Squarespace website templates for sale!
Related articles